What is Paperless NGX?
Paperless is a mature document management system with lots of features. NGX is the latest fork. I highly recommend it, but I won’t go into the features here – just search YouTube for some videos and there is lots of information.
So, if there is lots of information, why would you want to follow this install? Because although there are lots of tutorials, most of them are focused on ‘fast’ and ‘easy’, and the upshot is something you can play around with, but would not want to rely on. The tutorials also don’t tend to go into the stack in much detail and can end up a bit “you know what to do”. I don’t. I really don’t.
Having mainly been using containers (and having other reasons for keeping my single home-server on Windows) I don’t have a Linux server to use. I also want to use a NAS for the file storage as I don’t have a lot of room on my server.
So, what are we doing?
A quick disclaimer before we dive in. I used perplexity.ai and ChatGPT heavily (and over many hours) to get this straight, so most credit goes to whomever it was stolen from by the AI.
The stack will be:
Windows 10 –> Hyper-V –>Ubuntu 24 LTS –> Docker
My Windows 10 is running on a Dell Optiplex 3050 (great as a small, cheap home server). I am also using an ASUS RT-AX86U with an external HD shared over Samba / CIFS for the NAS storage. If your NAS supports NFS instead, then I would recommend using that, but I won’t be covering it here.
We’ll end up with a working install of Paperless NGX with the data folders mounted on the NAS and the GUI available on the local network. All functionality will work, including ingesting documents using the ‘consume’ folder and exporting (again, to the NAS).
You could easily do the exports to another location, such as a second NAS or cloud storage, and also expose the GUI to the internet if you really wanted, but I prefer access over VPN. If you do want to expose the GUI, be aware that this install does not include setting up https.
Why not just Docker Containers like the tutorials?
Well, I do use Docker on Windows 10 and WSL, however, I don’t suggest trying to get the mounts working properly as well as sharing the GUI on the LAN. Life is too short and the information that I could fine was dated, confusing, sometimes plain wrong and ultimately not that helpful. I even asked ChatGPT to help but it just laughed and told me not to waste its time. If anyone cracks this, then be a hero and let me know!
The Build
Getting started with Hyper-V and Ubuntu
Install Hyper-V, if you don’t already have it. There are plenty of tutorials which will cover this.
Next, download the ISO of Ubuntu Server. I used 24.04.2 LTS.
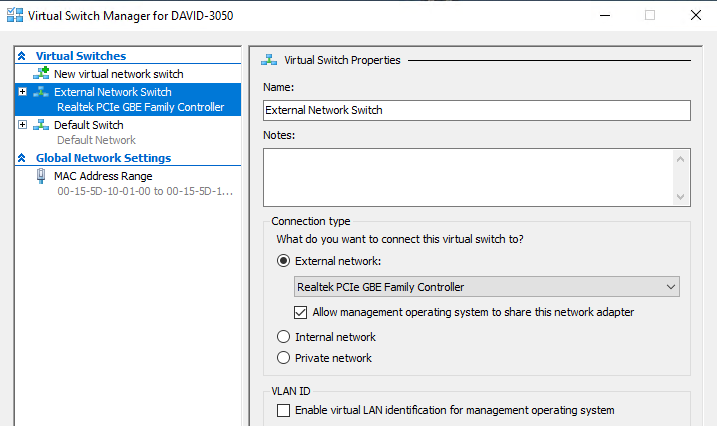
In Hyper-V, find the Virtual Switch Manager and create a new external switch associated with your network adapter. This is my added switch:
Create a new Virtual Machine (don’t use the wizard). I chose Generation 2. I made the mistake of creating a 10gb partition the first time, but this was too small and was running out of space to process large temp files. We’re not storing the actual library files on this machine, so I would recommend 20gb.
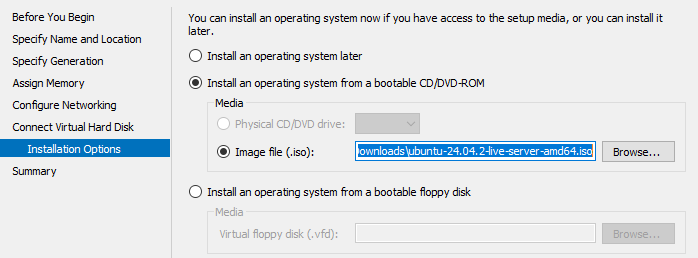
You can use most of the defaults. In Configure Networking, select the switch you just created and in Installation Options, choose your Ubuntu ISO as the install source:
Follow the Ubuntu installation. Ensure that you check the option to install Docker and set eth0 to the external network switch you set up on Hyper-V. I used DHCP and then fixed the IP on the router.
Mount the NAS
Note: I will be using my Ubuntu user ‘david’ and the name of my share / mount ‘shared’ for clarity and highlighting any sections you are likely to want to change to match your environment.
The mount will vary slightly with your SMB version. Googling my router, the result was that it didn’t support SMB2, but in reality, it does. I haven’t tried 2.1, but did try 3.0 with no success.
As mentioned above, this is for CIFS / Samba.
sudo apt update
sudo apt upgrade
sudo apt install cifs-utils

# my NAS folder is shared and will have a folder
# called paperless
sudo mkdir -p /mnt/shared
Next we will create a file with our credentials.
sudo vim /home/david/.smbcredentialsand save with the user name and password in this format
username=your_nas_username
password=your_nas_password
and secure the file:
sudo chmod 600 /home/david/.smbcredentialsSet up the automatic mounting upon boot:
sudo vim /etc/fstaband add the mapping:
# NAS Samba Share
//192.168.2.1/shared /mnt/shared cifs credentials=/home/david/.smbcredentials,iocharset=utf8,vers=2.0,uid=1000,gid=1000,file_mode=0755,dir_mode=0755 0 0
Install and configure Paperless
Start by adding your use to a docker group so you can run the containers:
sudo groupadd docker
newgrp docker
sudo usermod -aG docker david
Use the installation script from https://docs.paperless-ngx.com/setup/ and install into a directory paperless-ngx under your user (don’t run as root). I also recommend using the PostgreSQL database.
Edit the docker-compose.env file:
vim /home/david/paperless-ngx/docker-compose.envCheck the time zone is set correctly. In my case I had to change to:
PAPERLESS_TIME_ZONE=Europe/LondonAnd add these settings to disable inotify (CIFS does not support this) and instead poll for any documents to ingest from the consume directory. These settings will poll every 20 seconds but also includes a delay as I was having failures without it.
PAPERLESS_CONSUMER_ENABLE_INOTIFY=false
PAPERLESS_CONSUMER_POLLING=20
PAPERLESS_CONSUMER_POLLING_DELAY=3
PAPERLESS_CONSUMER_POLLING_RETRY_COUNT=3
Next, edit the YAML file in the same directory:
vim /home/david/paperless-ngx/docker-compose.ymlMost of this can be left, but under the webserver block (this is the main container which relies on the other dependencies, I have highlighted in bold the changes you want to pay attention to. I changed the port I will access the web server on to 8009, turned off the restart (more on that later) and mapped the internal volumes to the correct folders on my NAS:
webserver:
    image: ghcr.io/paperless-ngx/paperless-ngx:latest
    restart: no
    depends_on:
      - db
      - broker
      - gotenberg
      - tika
    ports:
      - "8009:8000"
    volumes:
      - /mnt/shared/paperless/data:/usr/src/paperless/data
      - /mnt/shared/paperless/media:/usr/src/paperless/media
      - /mnt/shared/paperless/export:/usr/src/paperless/export
      - /mnt/shared/paperless/consume:/usr/src/paperless/consume
Configure Paperless as a service to start on reboot
I had a lot of issues with rebooting, mainly with finding a configuration which would get the NAS mounted and then correctly start the containers.
Create a new service file:
sudo vim /etc/systemd/system/paperless.serviceAdd the following which waits for the NAS to finish mounting and includes an addtional sleep of 10 seconds before starting the paperless service:
[Unit]
Description=Paperless-ngx container stack
Requires=snap.docker.dockerd.service network-online.target mnt-shared.mount
After=snap.docker.dockerd.service network-online.target mnt-shared.mount

[Service]
Type=oneshot
WorkingDirectory=/home/david/paperless-ngx
ExecStart=/bin/bash -c 'sleep 10 && /snap/bin/docker compose up -d'
ExecStop=/snap/bin/docker compose down
RemainAfterExit=true
TimeoutStartSec=0

[Install]
WantedBy=multi-user.target
Enable the service:
sudo systemctl daemon-reexec
sudo systemctl daemon-reload
sudo systemctl enable paperless.service
Backup / Export files
Ideally, if you had a second NAS available, you could map your export folder there in docker-compose.yml, but keeping things simple, we’ll set up an export to run every night at 02:30 which keeps the last 3 files. You’ll need to do something to copy the exported file elsewhere, or a failure of you NAS will lose your data AND your backup!
Create a script file:
vim /home/david/paperless-ngx/export.shSave this in the file:
#!/bin/bash

set -e

# Define paths
PROJECT_DIR="/home/david/paperless-ngx"
EXPORT_DIR="$PROJECT_DIR/export"
TIMESTAMP=$(date +"%Y-%m-%d_%H-%M-%S")
EXPORT_FILE="$EXPORT_DIR/paperless_export_$TIMESTAMP.zip"

# Ensure export dir exists
mkdir -p "$EXPORT_DIR"

# Go to Paperless project directory
cd "$PROJECT_DIR" || exit 1

# Run the export
docker compose exec -T webserver document_exporter -z - > "$EXPORT_FILE"

# Keep only the 3 most recent backups
cd "$EXPORT_DIR"
ls -1t paperless_export_*.zip | tail -n +4 | xargs -r rm --
Make it executable:
chmod +x /home/david/paperless-ngx/export.shEdit / create cron:
crontab -eAdd this to start at 02:30 and output to a log file:
30 2 * * * /home/david/paperless-ngx/export.sh >> /home/david/paperless-ngx/export.log 2>&1The Finish Line
You should be ready to go!
cd /home/david/paperless-ngx
docker compose up -d
It takes a little while for the webserver to start (check its status with docker ps).
Once the status for the for the main paperless container is up and healthy, navigate to your install (for me http://192.168.2.1:8009)and follow the instructions to set up your first user and get started with Paperless-NGX.
Please feel free to ask any questions in the comments, and I hope this helps!